Wednesday, August 21, 2013

Where Have I been??

I have had quite the hiatus from this little blog of mine, I have been having one of the roughest years of my life. I have had so many negative and hard things happen to myself, and my family so far this year, and I am about done with it! I last blogged in February, In March a pipe burst in my master bathroom and leaked down through the ceiling in the play room. We spent a week in a hotel room and are still finishing the master bathroom from this. In May right after Mothers Day another pie burst, this time in the kitchen, this fix wasn't as easy as the bathroom. The entire kitchen had to be gutted the floor, counter tops, and eventually the cabinets were all replaced. I lived for 6 weeks in a 600 sq ft 2 bed 2ba hotel room, this would have felt like a vacation except for the fact that I have 3 very active boys and a little girl I nanny on top of that. I was also driving both boys to school and picking them up, normally they take a 15 min bus ride. It was a nightmare to say the least.


Once we got home we got busy, working on projects that had been on hold while we lived in a hotel. My husband and I were excited to have our 3 boys stay with relatives for a week so we could tackle most of the projects we had left and really get our house in order. On July 22nd I met my mom in Ashland, Oregon as the half way point and dropped the two older boys with her for a week. We slept there for the night, and early the next morning we went our separate ways, I was almost to Salem Oregon and about halfway from home when I glanced to the south bound side of the freeway, their was an accident, and as I glanced back in front of me, I saw all the cars almost stopped and I slammed on my brakes.....the next thing I knew I was laying on my side in a completely totaled vehicle. I thought I had felt and heard a splash so I quickly freed myself so that I could get out to swim, when I stood up I realized I was not in any water, and that is when I noticed the waterfall of blood streaming from my mouth. I was taken quickly to the hospital and checked out top to bottom.


 I had a 3rd degree burn on my shoulder and chest from the seat belt that saved my life, my tongue barely in one piece and a very large and deep cut in my mouth. I had several stitches and pain medicine, and waited for my husband to arrive so we could make a 4 hour trek home. I can honestly say I had never felt so terrified in my life, nor have I ever felt so relieved not to have my children with me. I have recovered physically from this accident but emotionally will take awhile. I feel like I am crashing whenever I step on the brakes, or feel the motion of stopping in a car. I feel trapped to my close surroundings, and impatient to get better so I can again be the driver I once was, the driver who loved long trips, and driving for hours. I hope you will share in this journey of healing with me, I already feel better after writing this.

Thursday, February 14, 2013

You {drive} me crazy Valentine ~tutorial~

I really love making my boys valentines every year. I try to do a different valentine for each one every year, I remember was younger I never had cool valentines and I always felt embarrassed, so it is really important to me that my boys have some really cool ones and it also gives me a chance to be creative :) This year I had planned on doing some really cute Valentine printables I had seen on Pinterest, but it didn't work out, I did use the LOVE BUG ones which turned out great but I had to rethink my little guy Asher's valentines. I headed to my favorite store to buy anything, Fred Meyer, for some ideas,I browsed the toy aisle and came up with 3 different things that could work, a 10pk of play doh, a 9pk of hot wheels and a big pack of little dinosaur toys. I started looking at my swag and decided the hot wheels would be the way to go, I even came up with a few sayings "you drive me crazy" and "you make my heart race" another good one would be "I never {tire} of you friendship".

 What you'll need:
  • red card stock
  • black paint pen
  • yellow paint pen
  • white paint pen or gel pen
  • hot wheels car
  • strong adhesive or cable ties

To get started I took 4"x5.5" red card stock and drew a windy road with a black paint pen, I use Elmer's brand paint pens, next use your yellow paint pen to make the dashed lane lines, and finish it off with the white lines on either side, add your saying and voila cuteness! The last thing to add is the car simply place the car on the road where you think it looks best and punch a small hole on either side, then use a cable tie to secure the car to the card stock. This is an incredibly quick and easy project, and because I snagged this 9 pk (exactly the number i needed) of hot wheels for only 5 bucks and I had everything else this averages to about 75 cents a card! I am pretty happy with how these turned out and I heard that Asher's classmates really loved them!


Monday, December 31, 2012

Happy New Year!

2012 was all around a wonderful year for myself and my family. I started 2012 with a little bitty baby, a 3 year old struggling with communication, and a 5 year old having a hard time in kindergarten. My mom was living with us, and as much as I loved having her the two Sagittariuses (mom and husband) were starting to bump heads. She moved out in March to the L.A area and almost immediately fell in love with an old friend,  she had been looking for a true connection for ummm...lets just say a long time, and I am beyond happy for her! My Sister started a blog  early in the year which has blossomed and grown into a hugely successful passion for her, I cant say enough how proud of her I am, and how amazing she truly is! My husband after working at one store for almost 5 years switched to a new store, where he is much happier. We also celebrated our 10 year anniversary this year, and got spoiled with a trip to Las Vegas! We took a week long road trip vacation to California which was so much fun and a wonderful family experience! Also this past summer I met my little brother who is now permanently living with my Dad and Step mom, which is the best thing for everyone, and I am so happy to have him back with us! My dear friend and her husband started the long and still ongoing process of divorce, this year has been very enlightening for her and she has made a huge transformation, and I am so proud of her!I ended this year with a busy busy toddler a 4 year old exploding with new words, and a 6 year old loving Kindergarten the second time around; I end this post and year with lots of optimism for the new year ahead, as well as gratefulness for the wonderful year behind me. Wishing all of you a happy New year and an awesome 2013!

Friday, December 14, 2012

MoM Dictionary...Holiday Edition

How about another round of definitions we all know and love as Stay at Home Bitches, but this time lets get into the holiday spirit.

Christmas: 1. Candy, hot chocolate, lots and lots of activities, crafts, housework, cooking, and a very long break from sanity school.

Holiday party: A party(more like nightmare) you volunteer to put together, cook for, and otherwise take time out of your life to put together, that in ten minutes is demolished,  resulting in sugar highed kindergartners.

New Years: Once this was a magical night full of midnight kisses and champagne, but now consists of fireworks viewed on the flat screen and apple cider.

Presents: A couple of expensive housewares you don't normally buy, come on Kuerig!!

Santa: The best thing about December unless your kid is old then I am sorry but I hope the ride was good while it lasted.

December:  The month of madness.

**Disclaimer**These definitions are intended for humor although based in reality.

I actually love this time of year more than any other, the magic and sparkle in my kids eyes when they visit Santa or when they spot a huge light display while we are running errands is why I love being a mom. Happy Holidays from Stay at Home Bitch!


Monday, December 10, 2012

~Retro Housewife Monday~ Thanks!

Week3: Thank you's

This week I am bringing thank you back. I am a fan of thank you cards, in any form, e-cards, Facebook, and paper, yes people paper! I wish I sent more people thank you cards, and just cards in general, and I wished more people did also. There is something about seeing a pretty envelope with your name handwritten on it, and a pretty card with any sentiment in it, that warms my heart. So I am challenging myself to send a handmade card every week to someone in my life for some reason for 3 months, and I challenge you to send some paper cuteness in the mail to someone that isn't a bill this month, and no Christmas cards don't count, but maybe if you made them ;)

Wednesday, December 5, 2012

Banners.... I'm Obsessed!

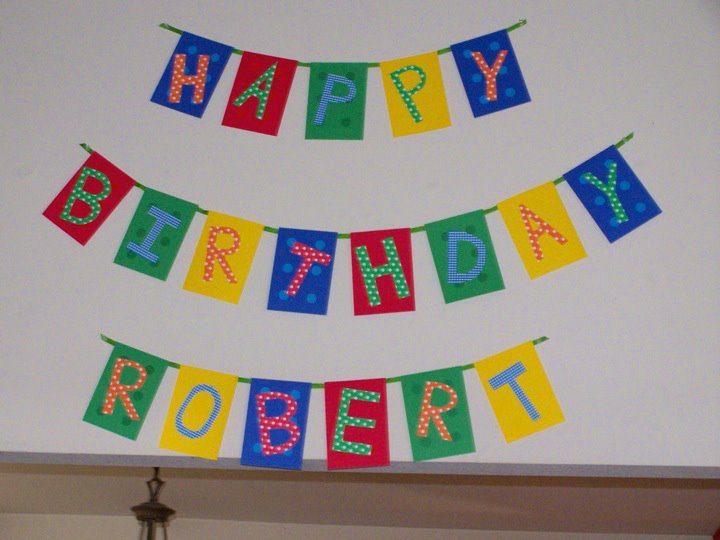
So I am Obsessed with banners! I love them so much I find any excuse to make them for every occasion! I even want to make them for other people when they are having an occasion at their home. I just love them!! I love coming up with different ideas and colors and ways to put them together!! Recently I made a burlap banner for Jaxsen's birthday, I originally wanted to do his name on it but decided not to, I thought it looked cute plain. I also made three for Roberts birthday that I love loved! His was a Lego themed birthday and it was so easy to make!! Banners are so easy and add so much character to decorations you should try it sometime!!!

Making a Banner

Step 1: Decide on a theme

Before you can make it you have to think about what you want to make, what you want it to look like, and what the occasion is. Banners consist of a series of "flags" attached together.  I like to go on pinterest and get some inspiration!

Step 2: Plan it out

Once you have an idea in your head of what you want, figure out the supplies you will need to make your banner. The materials I use are usually paper, fabric, ribbon, or string. Don't let that limit you, be creative and think about what would best go with the theme.

Step 3: Get it together

Go purchase the supplies you need, or use what is around you, and get creative. When working with paper the easiest way to attach each flag together is to punch a hole in each corner and secure with string, ribbon, or even wire. When making a fabric banner it is easiest to glue all the flags to a single piece of ribbon, etc.

Step 4: Attach Letters (optional)

If you are going to use letters I do this at the end after the banner is all attached, I use to put the letters on first but I have assembled enough to know you can't assemble the letters out of order if you put them on at the end.

Step 5: Admire :)

Step back and check out your gorgeous new banner!

Monday, December 3, 2012

~Modern Housewife Monday~ Pin some?

Week 2: Pinterest

Oh Pinterest how I love you! I use pinterest for everything I have stopped searching google or bing, and search anything and everything on pinterest. I use it to find recipes, crafts, DIY projects, advice,and of course new blogs. Pinterest does exactly what it is supposed to do makes my life easier, and I love using it, so there for I love making my life easier by using pinterest? It is an extremely useful tool for wives and mothers, I recommend getting on there and get pinning, start with a recipe board, and craft board and go from there, believe me you won't be disappointed, and make sure to follow Stayathomeb on pinterest!!